go check it out! shes also giivng 10% off her already great prices on all tim holtz stuff!
http://live-teach-create.blogspot.com/2010/07/tim-holtz-giveaway-and-sale.html
Saturday, July 24, 2010
Friday, July 23, 2010


Thursday, July 22, 2010
ACRYLIC ALBUM PAGE 10
here is page 10 and these are chipboard frames that I glimmer misted and inked the edges. I added a little circle jounaling spot and used my edger for the paper.

Here isi the cutest llittle duck I wanted to add to this book...I used some alcohol inks to give it some color with a paint brush.

a bling flourish I hand stuck!

These plates were with the MME paper pack I bought and I inked them and added some ribbon to the ends.
Page 11 TMW!

Page 11 TMW!
Wednesday, July 21, 2010
ACRYLIC ALBUM PAGE 9
Page 9 is titles "sweet baby" , which is a rubon that I glossy accented! I added the pink flowery paper to cover my glue from the page before and added the heart journaling spot to cover the grungeboard from the back. The medium sized heart I decorated both sides when I glued it down to the back of this page and used glossy accents to glue it so it looks nice..and the smaller heart I had 2 of that size so I just butted them up against eachother!


Dont u love the dimention of acrylic pages!!!!!!!!!!!!?

close up of the hearts and u can see the page before this page which gives great dimention!
gotta love glossy accents!

page 10 TMW!!!

gotta love glossy accents!

page 10 TMW!!!
Tuesday, July 20, 2010
ACRYLIC ALBUM PAGE 8
Page 8 Is "Our Hearts" this by far is my last fav page :( ....
I used some grunge board on here which are the hearts and key and keyhole...and while I love all the grungeboard and the page edges which i punched with my new punch...I just dont care for how it all came together...BUT u gotta have one page u dont care for in every book u make right!? heres mine!


its so unliked I dont even want to explain what I have done! lmao
page 9 TMW ...oh, and I like it!!!!!!!!!!!!!! :)
Monday, July 19, 2010
ACRYLIC ALBUM PAGE 7
Page 7 is not titled!! just a very fun page! the film strip again on paper and same idea with the flower and film strip/ribbon.


Notice here is the BACKS of the bling that I used on the page before...What I did was use my alcohol inks to make them look green and pink (by using a paint brush to brush the circles of the backs of the blings) and then I put a blob of glossy accents for each bling spot! I love how this came out and recommend it for all acrylic pages so you dont have to see the backs of bling!!!
So what do u think of that alcohol ink/glossy accent technique for the backs of bling???

So what do u think of that alcohol ink/glossy accent technique for the backs of bling???
Page 8 tmw!
Sunday, July 18, 2010
ACRYLIC ALBUM PAGE 6
Page 6 is "Cute as a Button"
I used this cute film strip diecut that I got from Tammy from a swap we did and I painted it with brown acrylic paint and glues it down to some of this beautiful MME paper.

I used this cute film strip diecut that I got from Tammy from a swap we did and I painted it with brown acrylic paint and glues it down to some of this beautiful MME paper.

Here is a close up of a bling flourish I made myself with some green and pinks...It was fun making my own flourish and was nice that I could have it go any way I wanted but also so you cannot see the "gluestrip" that most flourish have! You should try it! I added a butterfly rubon at the top and glossy accented it!

This is Tim Holtz' film strip that I glued with glossy accents over some really cute ribbon I got on clearance at joanns!!! I LOVE how it came out!!! 

sorry this is sideways! another lollipop flower inked in bright pink and stickled with some buttons in the middle.
Page 7 TMW!!

Page 7 TMW!!
Saturday, July 17, 2010
ACRYLIC ALBUM PAGE 5
Page 5 is titles "little angel" and is a rubon that I added to the circles at the top of the page...I also drew some clouds on there for some more fun! Sorry this pic is sideways! UGH...I Glimmer misted this frame to make it the color I wanted it and added the flowers and button center to the corner with some doodled flourishes with my signo white pen. The two smaller flowers are rubons.

Close up of the Glimmer Misted flowers and the doodles.

Close up of the title and the paper circles to hid the page befores title!
Page 6 TMW!!!!

Page 6 TMW!!!!
Friday, July 16, 2010
ACRYLIC ALBUM PAGE 4
Titled "Sweet Little One" this was a rubon from MME which went with the papers I used...I added the orange to the back of this page (on page 5).

OOPs, not sure how Cole got snuck in here but I dont know how to delete a pic so hes staying! lol I love this pic of him, hes being so silly with his faces! ANYWAYS .......
close up of the title rubon and I added some doodles to the edges for fun which u can see on page 5 also.


close up of the title rubon and I added some doodles to the edges for fun which u can see on page 5 also.

Some Primas I glimmer missted and added a cute flower button and knot. I stickled this frame cause it needed some dimention!
Page 5 Tmw!!!!!!!!!!!!

Page 5 Tmw!!!!!!!!!!!!
Thursday, July 15, 2010
ACRYLIC ALBUM PAGE 3
Page 3 is titled "Father"
On this page I had fun with some pink burlap ribbon I found at my LSS. I also loved being able to use the screw head brads and make this page alittle manly yet very girly! The father glittered word was very bright so I used one of my green ink pads and distressed it alittle!
On this page I had fun with some pink burlap ribbon I found at my LSS. I also loved being able to use the screw head brads and make this page alittle manly yet very girly! The father glittered word was very bright so I used one of my green ink pads and distressed it alittle!
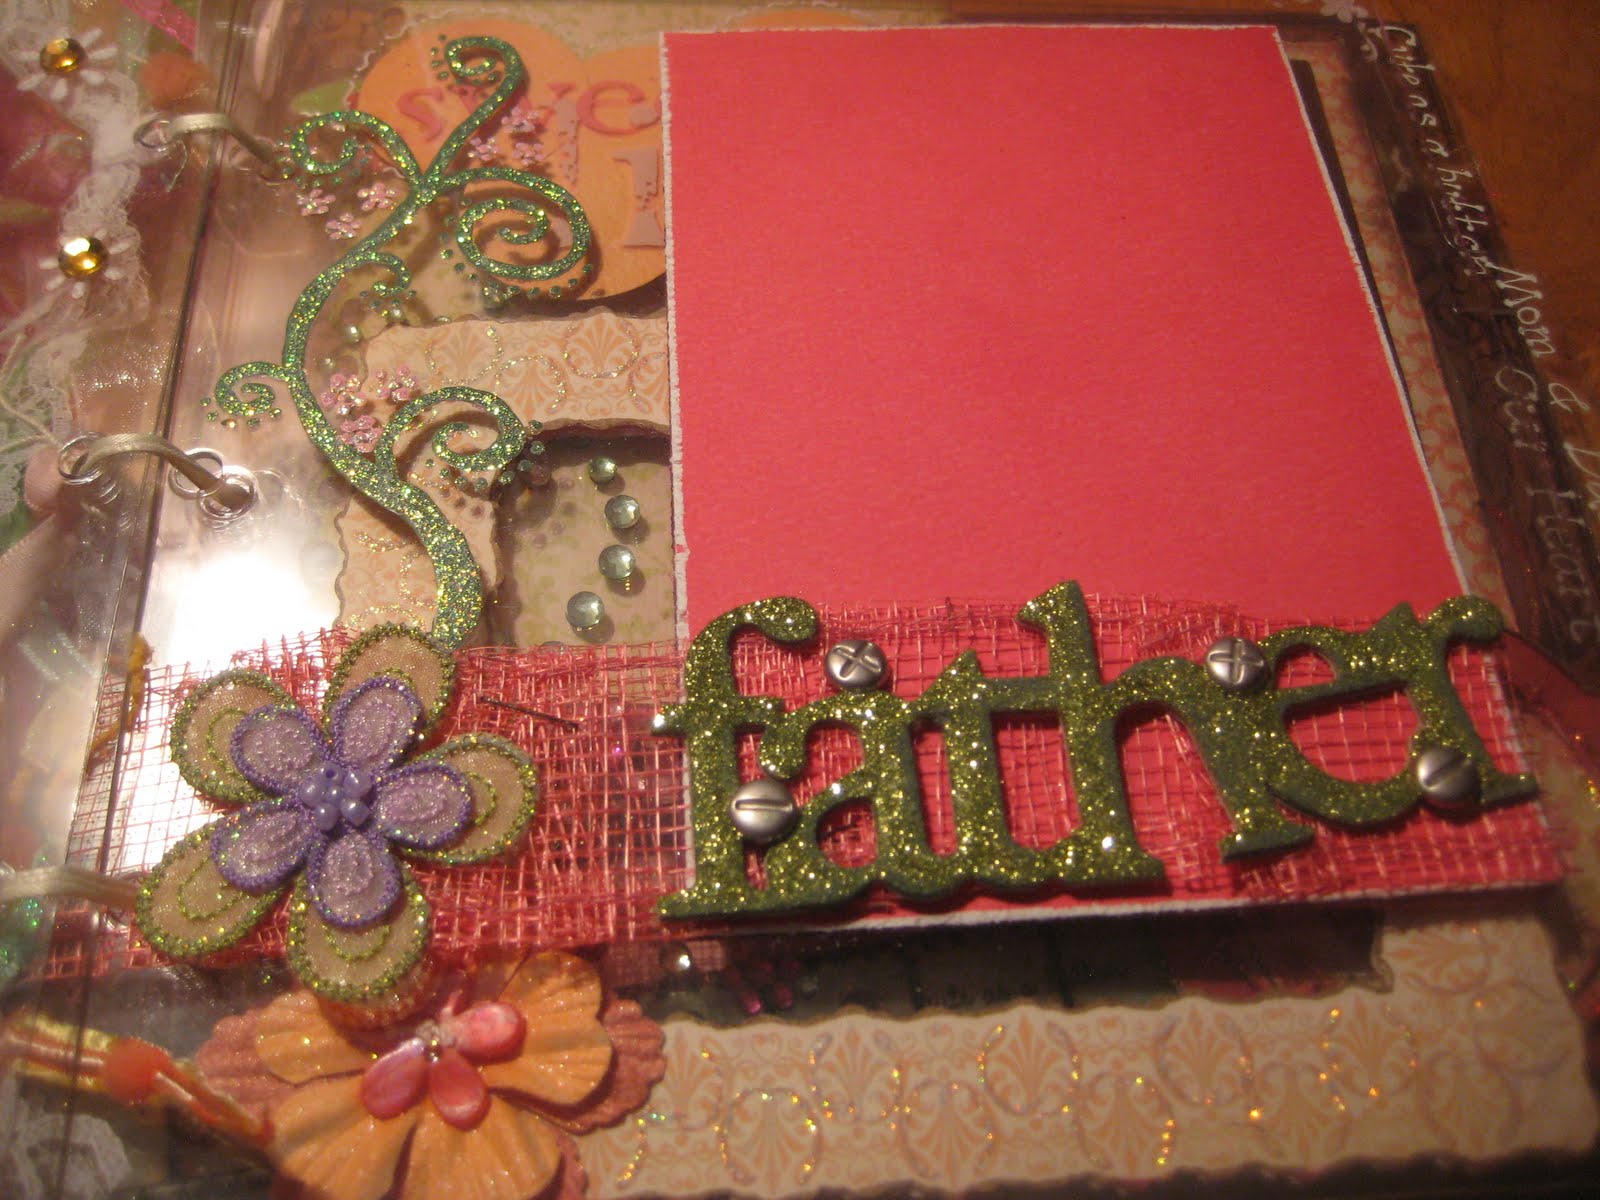
This vine that you could see on the first page peeking thru I freehanded with green acrylic paint then added stickles on top. I freehanded the flowers with some pink acrylic paint and stickled them too. The flowers were bought at walmart and were actually ironons but I just added stickles to the edges and glued them down! The burlap ribbon was scrunched together and stapled and u can see a staple in this picture.


detail of the handpainted flourish vine and flowers:

Here u can see the distressing alittle bit...and get a better look at the screwhead brads that i picked up at joanns. I distressed the edge of the picture matt with my scissors and this paper had a white core.

Wednesday, July 14, 2010
ACRYLIC ALBUM PAGE 2
Page 2 is Titled "Mother".
So as u can see I did the same layout on this page as is on page 1! Thats the trick! ...Another Lollipop flower which is back to back with the lollipop flower from the first page. the rubon flowers from the first page show to this page and I added some bling in the middles and they look great! I also love how you can see all thr ribbons and fibers from the binding!
So as u can see I did the same layout on this page as is on page 1! Thats the trick! ...Another Lollipop flower which is back to back with the lollipop flower from the first page. the rubon flowers from the first page show to this page and I added some bling in the middles and they look great! I also love how you can see all thr ribbons and fibers from the binding!

Here u can see how I decorated the rubons from page 2. I added stickles and some bling in the middle! I also added a paper strip to the lace to cover my glue and added a saying on the strip about being a mother.

The Mother stickers were covered in crackle accents and altho you cant see it here they do look neat in person!

Tuesday, July 13, 2010
ACRYLIC ALBUM PAGE 1
Welcome back! As promised, here is page 1!
The first page in the album is titled "Welcome Home"...here is the first lollipop flower of the album! I used some scraps to make the circles and just plopped them on one by one adding a brad to the middle which keeps them together! I dark pink inked the edges and added stickles! I am happy how it came out!...there are three places for pictures on this page!
The first page in the album is titled "Welcome Home"...here is the first lollipop flower of the album! I used some scraps to make the circles and just plopped them on one by one adding a brad to the middle which keeps them together! I dark pink inked the edges and added stickles! I am happy how it came out!...there are three places for pictures on this page!

Above the lollipop flower is just the three small daisy rubons but I took advantage of the acrylic being transparent and used the vine (from page 3)as a visual on this page too!

One the right side of the page I added some lace and then a strip of paper and bling...to the right of that I added flower rubons that spell out "Welcome Home"...you will see tomorrow how I make the back of the rubons still look good and incorporate them into the back page!
Stay tuned for page 2 tomorrow!

Stay tuned for page 2 tomorrow!
Monday, July 12, 2010
Acrylic Album Cover
Ok so here is MY ACRYLIC ALBUM....
I will start with the cover to show u even tho I took Kathryns tip on starting at the back.
The album is titled BABY GIRL and I am making this for a friend who is currently preggers and due in November. The title is a rub on from a set that I picked up from Hobby Lobby. Im loving all the shadows and visuals the acrylic album is unique for since the pages are clear!

The only stuff on the cover is the "baby girl" rub on and the vines and the large flower at the top of the page...I wanted to keep it simple cause I like that look and how you can see to the second page where you will see pictures of the baby once they are inserted! I decided not to use the rings this album came with, but I bound it with some ribbon cause I think it is more user friendly!

The vine is a felt sticker that I picked up at our trade show here in Phx last year...and I used some glimmer mist on it since it was white...The flowers I picked up out of a bin of loose flowers at my LSS, added three different colors of glimmer mists and some bling to the middle. sorry the pic is on its side! (cock ur head to the left and you will be fine!) :)
STAY TUNED FOR TOMORROWS POST: PAGE 1
I had alot of fun with this album and plan on sharing a new page with you everyday for the next 2weeks so keep checking in!

STAY TUNED FOR TOMORROWS POST: PAGE 1
I had alot of fun with this album and plan on sharing a new page with you everyday for the next 2weeks so keep checking in!
I was worried that this was going to be hard but I found it even easier than just a normal chipboard mini since it took less time decorating pages cause what u did on the front of the page u do on the backside with alittle planning so its less time consuming trying to come up with ideas for each and every page!
Life on the {Scrap}Beach Challenges for JULY
Life on the {scrap}beach challenges!
Challenge #1: Head in the clouds
Challenge #1: Head in the clouds

Challenge #2: Back to basics
this was easy for me cause i dont usually use primas and such! 

Challenge #4: The first cut is the deepest
I love this robot paper and couldnt wait to use it for coles bday!


Challenge 5: Raise your glass
I can be alittle more creative with glossy accents than this but I was running out of steam as this was the last layout i did but i used GA on the title.

Challenge 6: All my memories
This is a pretty new memory for me but something I will never forget! Its when cole got his first BIG BOY BIKE! I also had fun using the texture boutique on the pictures again which gave it a fun look!
IM hoping to get the challenge #3 done sometime today cause I would love to win the page maps book! I already have the craft knife and also the tote but still wanted to play along and do the challenges!

IM hoping to get the challenge #3 done sometime today cause I would love to win the page maps book! I already have the craft knife and also the tote but still wanted to play along and do the challenges!
Subscribe to:
Posts (Atom)